Salesforce Learning Guide

Tuesday 18 November 2014

Introduction about Cloud Computing

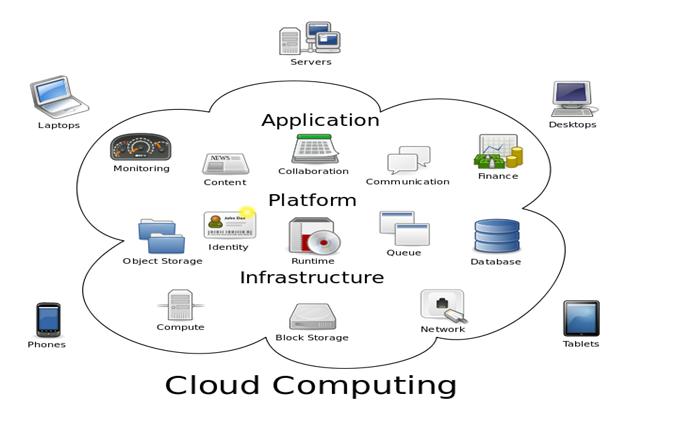
“What’s the cloud?”  “Where is the cloud?”  “Are we in the cloud now?!” These are all questions you’ve probably heard or even asked yourself. Now new trend in IT is Cloud computing.

In the simplest terms, cloud computing means storing and accessing data and programs over the Internet instead of your computer’s hard drive. 

What cloud computing is not about is your hard drive. When you store data on–or run programs from the hard drive, that’s called local storage and computing. Everything you need is physically close to you, which means accessing your data is fast and easy (for that one computer, or others on the local network). Working off your hard drive is how the computer industry functioned for decades and some argue it’s still superior to cloud computing, for reasons I’ll explain shortly.

The cloud is also not about having a dedicated hardware server in residence. Storing data on a home or office network does not count as utilizing the cloud.

For it to be considered “cloud computing,” you need to access your data or your programs over the Internet, or at the very least, have that data synchronized with other information over the Net. In a big business, you may know all there is to know about what’s on the other side of the connection; as an individual user, you may never have any idea what kind of massive data-processing is happening on the other end. The end result is the same: with an online connection, cloud computing can be done anywhere, anytime.

Cloud Computing

Life before cloud computing

Traditional business applications have always been very complicated and expensive. The amount and variety of hardware and software required to run them are daunting. You need a whole team of experts to install, configure, test, run, secure, and update them.
When you multiply this effort across dozens or hundreds of apps, it’s easy to see why the biggest companies with the best IT departments aren’t getting the apps they need. Small and mid-sized businesses don’t stand a chance.

Cloud computing: a better way

With cloud computing, you eliminate those headaches because you’re not managing hardware and software—that’s the responsibility of an experienced vendor like salesforce.com. The shared infrastructure means it works like a utility: You only pay for what you need, upgrades are automatic, and scaling up or down is easy.
Cloud-based apps can be up and running in days or weeks, and they cost less. With a cloud app, you just open a browser, log in, customize the app, and start using it.
Businesses are running all kinds of apps in the cloud, like customer relationship management (CRM), HR, accounting, and much more. Some of the world’s largest companies moved their applications to the cloud with salesforce.com after rigorously testing the security and reliability of our infrastructure.
As cloud computing grows in popularity, thousands of companies are simply rebranding their non-cloud products and services as “cloud computing.” Always dig deeper when evaluating cloud offerings and keep in mind that if you have to buy and manage hardware and software, what you’re looking at isn’t really cloud computing but a false cloud.

Characteristics of Cloud Computing

On-demand: Resources should be always available when you need them, and you have control over turning them on or off to ensure there’s no lack of resource or wastage happen.
Scalable: You should be able to scale (increase or decrease the resource) when necessary. The cloud providers should have sufficient capacity to meet customer’s needs.
Multi-tenant: Sometimes you may be sharing the same resource (e.g. hardware) with another tenant. But of course, this is transparent to the customer. Cloud provider shall responsible the security aspect, ensuring that one tenant won’t be able to access other’s data.
Self-service computation and storage resource: Related processes including: billing, resource provisioning, and deployment should be self-service and automated, involving much less manual processing. If a machine where our service is hosted fails, the cloud provider should be able to failover our service immediately.
Reliability:  Cloud provider should be able to provide customer reliability service, committing to uptimes of their service.
Utility-based subscription: You will pay the cloud provider as a utility based subscription, just like paying your electricity bill – without any upfront investment.

Service models in cloud computing

1.       Infrastructure as a service (IaaS)
2.       Platform as a service (PaaS)
3.       Software as a service (SaaS)
4.       Network as a service (NaaS)

Services
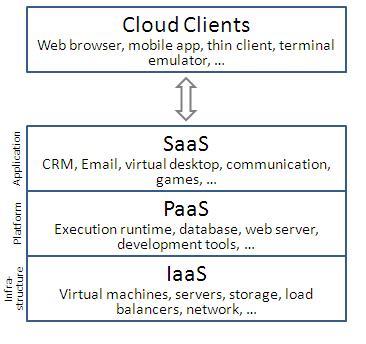
Service Models in cloud computing

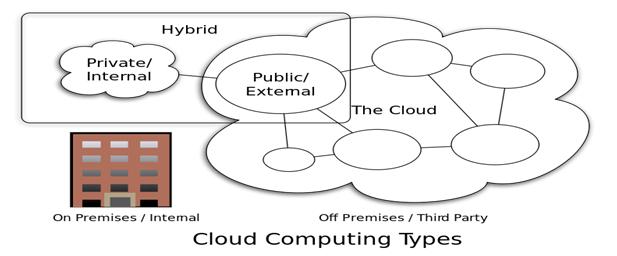
Cloud computing Types

A public cloud is one based on the standard cloud computing model, in which a service provider makes resources, such as applications and storage, available to the general public over the Internet. Public cloud services may be free or offered on a pay-per-usage model.
A private cloud is designed to offer the same features and benefits of public cloud systems, but removes a number of objections to the cloud computing model including control over enterprise and customer data, worries about security, and issues connected to regulatory compliance.
A hybrid cloud is a composition of at least one private cloud and at least one public cloud. A hybrid cloud is typically offered in one of two ways: a vendor has a private cloud and forms a partnership with a public cloud provider, or a public cloud provider forms a partnership with a vendor that provides private cloud platforms.
Cloud Computing Types
Following are list of salesforce(Cloud computing Training) materials.

1. To view basic fundamental Salesforce (Cloud computing Training) Material click following link.

Salesforce Fundamentals (Force.com Platform Fundamentals)

2. To know the Sales force editions and Pricing details See the following link.

Salesforce-editions-and-Pricing

3. To know more about Salesforce(Cloud computing Training) Material see the following links.

Salesforce Development Life Cycle

Salesforce Apex code developers guide

Salesforce visual force developers guide
Model view controller (MVC) is a software architecture pattern which separates the representation of information from the user’s interaction with it.

In addition to dividing the application into three kinds of components, the MVC design defines the interactions between them.

A controller can send commands to its associated view to change the view’s presentation of the model (e.g., by scrolling through a document). It can also send commands to the model to update the model’s state (e.g., editing a document).

A model notifies its associated views and controllers when there has been a change in its state. This notification allows the views to produce updated output, and the controllers to change the available set of commands. A passive implementation of MVC omits these notifications, because the application does not require them or the software platform does not support them.

A view requests from the model the information that it needs to generate an output representation.

Model View Controller (MVC)

SFDC MVC: You can write your VIEW pages using SFDC visual force (VF pages). VF pages are similar to our JSP pages.  Each VF page is associated with a Controller. you can make use to already built Standard controllers or you can write your own controller using Apex language. Apex is OO and very much similar to our JAVA. you can also write Model Classes using Apex.

Visualforce uses the traditional model-view-controller (MVC) paradigm, with the option to use auto-generated controllers for database objects, providing simple and tight integration with the database. You can write your own controllers, or extensions to controllers, using Apex Code. Visualforce also provides AJAX components, and embeds the formula expression language for action, data and component binding interaction.

Salesforce.com is award winning tool to manage all the data of sales team of an organization. The flexibility and assurance of safe data provided by Salesforce.com results into nonparallel development capabilities to the developer.
SFDC MVC pattern contains below three modules:
  1. Model
  2. View
  3. Controller
Model: What schema and data does salesforce uses to represent the system completely. In salesforce, we can say that sObjects are the model as every entity in salesforce is mapped to some sObject.
View: How the schema and data is represented. Visualforce is used to present the data to users.
Controller: How the interface actions. Controllers are used to perform the actions whenever users interact with visual force.
In SFDC
1. Visual Force pages, Page Layouts, Tabs comes under View Layer of Model View controller .
2. Workflows, Apex Classes, Triggers comes under Controller part in Model View controller .
3. Objects, Fields, Relationships comes under Model Layer of Model View Controller .

Using VLOOKUP function in validation rules

What is the purpose of VLOOKUP function? It searches an object for a record where specified field matches the specified lookup value. If a match is found, returns another specified value.

Syntax of vlookup:
VLOOKUP(field_to_return, field_on_lookup_object, lookup_value)
Here I will give a simple example, how to use VLOOKUP function in validation rule.
Example: Create validation rule that checks the “Billing ZIP/postal code” entered against a table to validate that the zip code and state match.

To track ZIP Codes I have created custom object called “Zip Code” in this object I am storing zip code, states & countries. And created below records (sample records) in this zip codes object.
ZIP Code State City
35004 Alabama Moody
35005 Alabama Adamsville
35010 Alabama Alexander City
90001 California Los Angeles
Below validation rule validate Billing zip/postal code in account object with the codes in zip code object. If you enter wrong zip code this validation rule throw an error.

Creating validation rule:
To create validation rule go to setup -> Build -> Customize -> Account -> Validation rule and enter required information.

Error condition formula:
VLOOKUP($ObjectType.Zip_code__c.Fields.State__c, $ObjectType.Zip_code__c.Fields.Name , LEFT( BillingPostalCode ,5))<> BillingState
See the below image for reference.
VLOOKUP
How to test this validation rule?
To test this validation rule go to Account tab and create new account record with enter billing city = Los Angeles, Billing State/Province = Califirnia and postal code = 3099 and save this record, you will get associated error message. If you enter correct data which is mentioned in above table, record will save. If you enter wrong data validation rule will fire an error.

See the below image for reference.
VLOOKUP

Working with Salesforce Chatter:

What is Salesforce chatter? Chatter in salesforce allows you to collaborate the people with each other in your organization. You can connect with your coworkers and you can share information securely in real time. You can create groups like Facebook groups such public groups and private groups and you can invite your coworkers to join those groups by using salesforce chatter. And also you share your comments, add images and you can like others comments/posts.

By default Salesforce chatter is enabled now in Salesforce (Organizations created after 22nd June 2010). If this is not enabled to your organization and if you want to enable this setup follow below steps.
Make sure that you have “Customize application” user permission to do this setup.
1. Login to Salesforce.
2. Setup -> Customize -> chatter -> settings and ‘enable’ chatter under chatter settings and save.
See the below screen for reference.
Salesforce Chatter
Once you enabled chatter, by default Global header will be enabled to your organization. And also by default you may fallow few users and records.
By enable chatter few additional profile permissions will come at profile/permission set level. Those are

App Permissions:
Salesforce Chatter: When you enable this functionality automatically this application permission will be enabled for all your profiles in slaesforce. If you don’t want to give this application permission to some profiles, you can disable this permission.

Tab Permission:
Chatter : When you enable chat functionality, this tab will automatically enable (default on) to all profiles in your organization. If you don’t want display this to some profiles you can hide this tab.

Administrative permissions: Chatter Internal User, Create and Own New Chatter Groups, Invite Customers to Chatter, Moderate Chatter, and Manage Chatter Messages.

General User permissions: Create and Share Links to Chatter Files, Insert System Field Values for Chatter Feeds.

Important notes when you enable chatter in salesforce:
- After enabling this you will see new look and feel. Global header will enable there you can search your sobject records, chatter feeds, Groups and users.
- All users will automatically fallow when you enable this for organization with 15 or fewer users.
- This functionality is automatically available for salesforce1 apps when you enable in your org.
- Few standard publisher action available when  enable this. And also you can create your own publisher actions.

There are many more interesting things about salesforce chatter. See reference to more about salesforce chatter.

Chatter Groups

What is a chatter groups? What type of chatter groups we can create? Groups allow collaborate with specific set of people. Many of you know about groups in Facebook. In Facebook you can create groups and you can invite your friends as a members. The same type of groups you can create in salesforce chatter groups and you can invite members to that group. We can create public and private chatter groups.
Public Group: In public groups every one can join and every one can see, add post, add files & add comments.

What public group members can do in public groups: Public chatter group Members can change email settings, they can invite people and they can leave the group.

If you are the public group the owner, if you are a public chatter group owner, you can add/remove group members, you can change the group photo, you can edit group settings like information section and description section and you can change member roles.

Private Group: In private groups only members can see add posts, comments and files. And also Group admin/Owner approval must to join in private groups. People who is having modify all permission at profile/permission set level  can see post, updates, and files, and they can join private groups directly.
What private group members can do in private groups: Private chatter group Members can change email settings, they can invite people and they can leave the group.

If you are the private group the owner, If you are a owner of private chatter group you can add/remove group members, you can change the group photo, you can edit group settings like information section and description section, you can change member roles and  you can accept/decline group member request.

Creating Chatter Group: 
To create chatter group user should have “Create and Own new chatter groups” user permission required at profile/permission set level.

To create chatter group login to salesforce -> click on chatter tab -> click on Groups and click on New Group. See the below screen for reference.
Chatter Group
After clicks on new group and enter required details and save it. See the below screen for reference.
Chatter Group
While creating groups you have to enter
1. Basic information like Group name, description and Archive settings.
2. Group access settings like Public and Private and save. After creating group, members/owners can see/edit group settings like email settings, information, description they can invite members to the group. And also publisher actions available those are marked in red color in below image and also you can share your posts. See the below screen for reference.
chatter group

Adding multiple records:

Generally by using standard salesforce tab you can enter only one record at a time form UI. I don’t want to enter single record at a time. I want to enter multiple records at time. How can we achieve this? We can achieve this by using simple visual force page.
Example: I want to enter multiple accounts in single  save. See the below visualforce page.

Visualforce page:
<apex:page Controller=”AddmultipleAccountsController”>
<apex:form >
<apex:pageBlock >
<apex:pageBlockTable value=”{!listAccount}” var=”acc”>
<apex:column headerValue=”Account Name”>
<apex:inputField value=”{!acc.Name}”/>
</apex:column>
<apex:column headerValue=”Account Number”>
<apex:inputField value=”{!acc.AccountNumber}”/>
</apex:column>
<apex:column headerValue=”Account Type”>
<apex:inputField value=”{!acc.Type}”/>
</apex:column>
<apex:column headerValue=”Industry”>
<apex:inputField value=”{!acc.Industry}”/>
</apex:column>
</apex:pageBlockTable>
<apex:pageBlockButtons >
<apex:commandButton value=”Add Accounts Row” action=”{!addAccount}”/>
<apex:commandButton value=”Save Accounts” action=”{!saveAccount}”/>
</apex:pageBlockButtons>
</apex:pageBlock>
</apex:form>
</apex:page>

Controller related to above page:
public class AddmultipleAccountsController {
Account account = new Account();
public list<Account> listAccount{ get; set; }
public AddmultipleAccountsController()
{
listAccount=new list<Account>();
listAccount.add(account);
}
Public void addAccount()
{
Account acc = new Account();
listAccount.add(acc);
}
public PageReference saveAccount() {
for(Integer i=0; i<listAccount.size(); i++)
{
insert listAccount;
}
return Page.Allaccountssaved;
}
}
Visualforce page Allaccountssaved( using this page above controller):
<apex:page sidebar=”false” showHeader=”true”>
<center><h3>Congrtas your accounts are successfully saved!!</h3></center>
</apex:page>

Output of above example:
Multiple records
Here Add Account row is used to enter one more account and Save Account is used to save all account records you entered. See below screen, you can understand functionality of Add Account Row button.
Multiple
After saving you will get below screen.
Multiple 3
This is simple example to explain how to enter multiple records at time form UI.

Object Permissions

What is object permissions? In salesforce we can provide permissions to object at profile/permissions sets level. Object level we can provide read, create, edit, delete, view all & Modify all permissions in profiles/permission sets.

Read: Users can only read/view records.
Create: Users can read & create records.
Edit: Users can read & Edit.
Delete: Users can read, Edit & delete records.
View All: Users can view all records in the object irrespective of sharing settings.
Modify All: Users can read, edit, delete, view all & modify all (can transfer, approve) irrespective of sharing settings.

Above 6 permissions we can set at object level in profile/permission set. Read, Create, Edit, Delete respects sharing settings. But View all & Modify all overrides sharing settings.

Navigation to provide object permissions

Setup -> Administer -> Manage Users -> profiles -> select the profile you want give object permissions and go to object permissions and provide required object permissions to profile. See the below screen for reference.
Object Permissions

Field Level Security (FLS):

What is Field level security (FLS)? At object level we can give permission on what user can with salesforce record like user can read, create, edit, delete, view all & modify all. Object permissions we can give at object level. Now i want to restrict few sensitive fields form my users. I don’t want display these sensitive fields for all users. We can restrict fields by using field level security.

We can give read & edit permissions to the field. We can handle these filed level permissions in three ways.
1. By using “set field level security” button at field level.
2. By using “view field accessibility” button at field level
3. In profiles/permission sets we can handle field level permissions.

How can we provide filed level security?
Now in Account object object i don’t want to display revenue filed for all profiles in salesforce organization. For few profiles i want give visible permission , For few profiles i don’t want display this filed and for few profiles i want to give both visible and edit permissions. So how many ways we can achieve this? We can achieve this  two ways first is from filed and second one is from profile.

1. Field level security by using set field level security button:
Go to the filed you want to enable field level permissions and click  on Set field level security button. See the below screen for reference.
Field level security
After clicking field level security button, there you can enable that field for profiles you want give access and save settings. See the below screen for reference.
FLS2
If you enable only visible check box, then user can read & edit that field. If you enable both visible & read only, then user can only see that field, he can edit.

2. By using view field accessibility button.
Go to the filed you want to enable field level permissions and click  on view field accessibility button. then you will navigate to below screen.
Field level Security
Here you can field accessibility options. Here we can manage field viability for profiles and page layouts. You can select fields in field access for field list view. If you want enable/disable permission click hyper link editable/hidden, you will get below screen.
Filed level security 
here you can select filed level security at profile level and you can select page layout options also.

3. Managing Field level security at profile level
To handle Field permissions go to profile you want choose and go to Field level security section and search for object you want enable field permissions, click on view and edit and provide permissions for required fields and save.
Field level security
Note: In profiles you can find Field level security section on profile detail page. You cannot find  Field permission on profile edit page.

What is viewState?

ViewState holds state of the visualforce page that holds state that includes the fields, components and controller state. Viewstate data in encrypted and cannot be viewed tools like firebug.
To maintain state in a Visualforce page, the Force.com platform includes the state of components, field values, and controller state in a hidden form element. This encrypted string is referred to as the view state and has a limit of 135KB.

The data in the viewstate should be sufficient to recreate the state of the visualforce page when the postback is received. To do this, viewstate stores:

- Stores Non transient data members in the associated controller (standard\custom) and controller extensions.
- Stores Objects that are reachable from a non-transient data member in a controller or extension.
-  Stores the component tree for that page, that tree represents the visualforce page’s component structure and the associated state, which are the values applied to those components.
- view state stores small amount of data.

How to see view state:
You can see view state when developer mode is enabled. See below screen.
ViewState

Rendering visualforce page as a pdf

How can you rendering vf page as a pdf? By using renderAs attribute you can render visualforce page as a pdf.
Where we can use renderAs attribute? We can use renderAs attribute in apexPage tag like below.
<apex:page  StandardController=”Account ” renderAs=”pdf”>
Below is simple code to rendering a visualforce page as pdf.
<apex:page renderAs=”pdf”>
<center>
<h1>Welocome to Salesforce Tutorial</h1>
</center>
</apex:page>
Below is the output for this.
RenderingAs

Force.com IDE

What is Force.com IDE? It is powerful tool, which is used to create/modify & deploying Salesforce applications.

How to install force.com IDE?
1. Install Java SE Development kit (JDK), Runtime environment – Force.com plug in will fail to load if you don’t have the full Java JDK.
2. Install eclipse.
3. After installing eclipse, launch eclipse and go to help and click on install software.
Foce.com IDE insallation
4. Click on add, in the add repository dialog window, set the name to “Force.com IDE” and give location to” http://media.developerforce.com/force-ide/eclipse42”. (This URL is for eclipse 4.2 & 4.3).   Click on OK.
Force.com Ide Installation 2
5. If you don’t have latest version of the software (java & eclipse), then clear the first checkbox the above screen details section. You will get all available versions of force.com IDE plug-ins & select the check box next to the force.com plug-in you want to install and click on next.
6. And click on next & accept terms and conditions and click on finish.
7. Eclipse downloads and installs the Force.com IDE and any other required dependencies. When install complete, you will be prompted to restart. Click yes.
8. When Eclipse restarts, select Window > Open Perspective > other, select Force.com and click OK.
Now you are ready to develop & customize Force.com applications in Eclipse. Use proxy settings when are working in secured networks. You can find this in General -> Network connection

Using force.com IDE

Using force.com IDE is very simple. How to create a simple project by using this tool?
1. Open Eclipse and go to file -> click on new and select force.com project & enter your project name and credentials.
How to use force.com IDE
2. After logging in, you can select metadata components to download.
How To Use Force.com IDE 2
3. After selecting metadata components click on finish. You will get all your selected metadata into your workspace. See below screen for reference.
How To Use Force.com IDE 3
4. How can I get latest changes from force.com server to IDE?
Go to components extracted from server earlier and right click and click on refresh from server to get latest changes to IDE.
Click on save to server to save latest changes from force.com IDE to server.
To deploy you changes from one org to other org click on deploy to server option.
How To Use Force.com IDE 4
This tool is very good tool to develop application in salesforce. We can deploy metadata changes and many more we can do by using this. After using this tool you will learn all features of this tool.

Standard Controllers

A StandardController object that is automatically provided for standard and all custom objects, bindable to a Visualforce page component with the “standardController” attribute. It provides a reference to a single/list of record to a set of common actions for data processing and default navigation.

What are the tasks of standard controller?
Standard controllers provides ability to access and interact with structured business data contained in records displays in the proper user interface.

Standard controller tasks: controlling data, controlling actions and controlling navigation.

Controlling Data:

Standard controllers fetches data and provide to the views such as page, list, dialog or forms.
Controlling data for a single record: One of the key functionality of standard controllers is to provide the data, and to facilitate binding a view’s controls to the records fields for either display or input. We can associate a standard controller with a visual force page by using “StandardController”  attribute.
<apex:page standardController=”Account”>                // standard object
<apex:page standardController=”customer__c”>        
// custom object
By using merge expressions we can add fields to visualforce pages. This is the same merge syntax used in email templates, formulas and any place that field values need to be merged for expression evaluation. Below highlighted blue color syntax are merge fields
<apex:outputField value="{!Account.Name}"/>
<apex:outputField value="{!Account.AccountNumber}"/>
<apex:inputField value="{!Account.Industry}"/>
<apex:inputField value="{!Account.Type}"/>
See the below syntax to represent represent related parent object fields.
<apex:inputField value="{!Account.Owner.Name}"/>
We can represent a related list in visualforce page by using below syntax.
<apex:relatedList list="Contacts"/>
To view output, after developing your page , you need to pass related sobject record id with your salesforce url. see below example.
https://c.apX.visual.force.com/apex/vfpage?id=XXXXXXXXXXXXXXX

Controlling data for list of records: 
We can manage list of records by using standard controller instruction set. We can define recordsetVar by using below syntax.
<apex:page standardController="Account" recordSetVar="accounts">
Standard controllers provide below additional actions for list of records.
First: Displays the first page of records in the set.
Second: Displays the last page of records in the set.
Next: Displays the next page of records in the set.
Previous: Displays the previous page of records in the set.

Controlling Actions & Navigation:
Actions: Standard controller responds to to user or programmatic commands initiated from a view such as “buttons & custom links.

There are two types of actions available on objects through standard controllers instruction set.
Stateful Actions: Direct binding to a standard controller instance referenced by the page.
Stateless Actions: Indirect binding to the standard controller instruction set of the force.com engine. 

Navigation: Standard Controllers navigate the user to any specific view associate with an action. 

What is Standard List Controllers?

By using standard standard list controllers we can manage set of records. For every standard controller there exists a standard list controller that allows you to create pages that display and act on a set of records, such as list pages, related lists, and mass action pages. We can associate define standard list controller by using recordSetVar.

<apex:page standardController="Account" recordSetVar="accounts">
 
Standard list controller provides additional four pagination actions. Those are first, last, next and previous.

We can use standard list controllers with the following objects.
Account, Asset, Campaign, Case, Contact, Contract, Idea, Lead, Opportunity, Order, Product2, Solution, User, Custom Objects.

Standard list controller example:
<apex:page standardController="Account" recordSetVar="accounts">
<apex:form >
<apex:pageBlock >
<apex:pageBlockTable value="{!Accounts}" var="a">
<apex:column headerValue="Account Name">
<apex:outputField value="{!a.name}"/>
</apex:column>
</apex:pageBlockTable>

<!-- pagination actions supported by standard list controller -->
<apex:pageBlockButtons >
<apex:commandButton value="First" action="{!first}"/>
<apex:commandButton value="Last" action="{!last}"/>
<apex:commandButton value="Next" action="{!next}"/>
<apex:commandButton value="previous" action="{!previous}"/>
</apex:pageBlockButtons>
</apex:pageBlock>
</apex:form>
</apex:page>

What is <apex:SelectList> tag?

Apex:selectList is used to display list options that allows user to select one.more values at a time. See below Syntax to use apex:select list
<apex:selectList size=”1″ value=”{!filterId}”>
<apex:actionSupport event=”onchange” reRender=”oppList”/>
<apex:selectOptions value=”{!listviewoptions}”/>
</apex:selectList>

Know more about selectList
Below is the simple example to display list of records in visualforce page with list view & actions.
<apex:page standardController="Opportunity" recordSetVar="opportunities">
<apex:form >
<apex:pageBlock title="Displaying Opportunities">

<!-- Below <ape:selectList> tag is used to display listview -->

<apex:selectList size="1" value="{!filterId}">
<apex:actionSupport event="onchange" reRender="oppList"/>
<apex:selectOptions value="{!listviewoptions}"/>
</apex:selectList>

<!-- below code displays list of opportunnities -->

<apex:pageBlockTable value="{!opportunities}" var="opp" id="oppList">
<apex:column value="{!opp.Name}"/>
<apex:column value="{!opp.Account.Name}"/>
<apex:column value="{!opp.StageName}"/>
<apex:column value="{!opp.Type}"/>
<apex:column value="{!opp.ExpectedRevenue}"/>
</apex:pageBlockTable>

<!-- Using List action to display first, last, next & previous list -->

<apex:pageBlockButtons location="Bottom">
<apex:commandLink value="First" action="{!First}"/> &nbsp;
<apex:commandLink value="Next" action="{!Next}"/> &nbsp;
<apex:commandLink value="Previous" action="{!Previous}"/> &nbsp;
<apex:commandLink value="Last" action="{!Last}"/>
</apex:pageBlockButtons>
</apex:pageBlock>
</apex:form>
</apex:page>

Custom Controllers

What is custom controller? why we go for custom controllers?
Standard controllers provides only built in standard functionality to visualforce pages, such as Save, Edit, Cancel & Delete etc….

We cannot customize/develop our own functionality by using standard controllers. By using custom controllers we can write our own functionality or override existing functionality. Custom controller is an Apex Class developed by us. See the below syntax to define custom controller in visualforce page.
<apex:page Controller=”ControllerName”>

 What is controller extension? Controller extension is custom/additional behavior to standard controllers. Extension is an apex class. We can add number of extensions to visualforce page. See below syntax to define extension.

<apex:page Controller=”ControllerName” extensions=”Class1, Class2,..”>
We can use Stnadard controller/ Custom Controller and extensions at a time. But we cannot use Standard controller & Custom controller at a time. See below syntax to understand.

<apex:page standardController=”ControllerName” extensions=”Class1, Class2,..”> Correct

 <apex:page Controller=”MYControllerName” extensions=”Class1, Class2,..”>   Correct syntax

<apex:page standardController=”MYControllerName” Controller=”MyController”>  Wrong

 What we can do by using Custom Controllers?

– We can override existing functionality
– We can create new functionality.
– We can customize navigation.
– We can use HTTP callouts & Web Services
– We can have control for how information is accessed on the page.

Example to create custom controller:

In this example, I am creating a visualforce page to create & save multiple accounts at a time by using visualforce page & Custom controller.
Code for Visualforce page
<apex:page Controller="AddmultipleAccountsController">
<apex:form >
<apex:pageBlock >
<apex:pageBlockTable value="{!listAccount}" var="acc">
<apex:column headerValue="Account Name">
<apex:inputField value="{!acc.Name}"/>
</apex:column>
<apex:column headerValue="Account Number">
<apex:inputField value="{!acc.AccountNumber}"/>
</apex:column>
<apex:column headerValue="Account Type">
<apex:inputField value="{!acc.Type}"/>
</apex:column>
<apex:column headerValue="Industry">
<apex:inputField value="{!acc.Industry}"/>
</apex:column>
</apex:pageBlockTable>
<apex:pageBlockButtons >
<apex:commandButton value="Add one more account" action="{!addAccount}"/>
<apex:commandButton value="Save Accounts" action="{!saveAccount}"/>
</apex:pageBlockButtons>
</apex:pageBlock>
</apex:form>
</apex:page>
 
Code for custom controller:
public class AddmultipleAccountsController {
Account account = new Account();
public list<Account> listAccount{ get; set; }
public AddmultipleAccountsController()
{
listAccount=new list<Account>();
listAccount.add(account);
}
Public void addAccount()
{
Account acc = new Account();
listAccount.add(acc);
}
public PageReference saveAccount() {
for(Integer i=0; i<listAccount.size(); i++)
{
insert listAccount;
}
return Page.Allaccountssaved;    // I am returning another vf page here.
}
}
Out put of above code: We can add multiple accounts at a time by using this page like below.
Here I am adding multiple rows and saving all records at time. We cannot achieve this by using standard controller. So i have written custom controller to achieve this.
Custom Controllers

Doing deployments when Active job is running

What is active job here? Any schedule job or apex job which is running in our salesforce system.
Generally in salesforce, we cannot perform deployments when active jobs are there & we are trying to deploy metadata related to active job in system. In this case we will remove jobs from our environment and continue with deployments.

But now, no need to stop schedule jobs in our environments to perform deployment when active jobs are running. In winter 15 release salesforce has provided a feature to continue with deployments when jobs are running in production.

Enabling the deployment of components with corresponding   active job.
To enable this go to setup -> deployment  settings -> “Allow deployments of components
when corresponding Apex jobs are pending or in progress” check this check box and save.
Deployment connection is renamed as deployment settings. See the below image for reference.
Deployment settings -  active jobs
Active jobs
I feel this is very useful option when are doing deployments. No need to stop jobs during deployments. But, this setting might cause apex jobs fail due to unsupported changes.

Quick Deploy –  Deployments in less time

What is quick deploy? By using this option you can deploy components to production with running test classes on your project release day. But you have to do successful validation before your release day.

Generally in salesforce deploying code to production very hard when your organization contain more test methods. If your organization contain more test methods, then your release will very long. But to avoid this, salesforce has provided quick deploy option. By using this option you can deploy code to production in very less time on your project release day.

This quick deployment option is only available for production environments. This not doesn’t applicable for non production organization & deployments not required for apex tests.

Salesforce has released this as a pilot program. If you want to enable this option for your org, then you you need to contact salesforce.com.

See below screen to under stand quick deployment option.
Quick Deployment
 If you did a successful validation of your package, then you can deploy that same deployment without running any test classes to your production. This option is valid for 4 days (96 hours) for successful validated deployment. Quick deployments are available only for validations with test runs that have passed  in the last four days.

actionFunction

What is <apex:actionFunction> tag? This tag defines  JavaScript functions to be called from JavaScript code.  By using this tag you can call controllers methods from java script code using an AJAX request .
This component must be a child of <apex:form> tag. And we cannot place this tag inside an iteration tag like <apex:pageBlockTable> & <apex:repet> now. Earlier we were able to do this.But with api version 23 we cannot place <apex:actionFunction> inside iteration tags.

Here I am providing an example, How to use <apex:actionFunction> tag is visualforce. I have created simple Lead form to enter lead details from custom page. Last name, Company & email are mandatory fields in below page. If any miss those required fields, I am displaying  alert by Javascript and i am calling method from java script to save the record. See below code to understand, how <apex:actionFunction> will work.
Visualforce page code:
<apex:page controller="InsertLeadController" showHeader="false">

<script type="text/javascript">
function validate()
    {
        if(document.getElementById('{!$Component.LF.LDB.Lname}').value == '' || document.getElementById('{!$Component.LF.LDB.comp}').value == '')
        {
            alert("LAST NMAE & Company are requird fields");
        }
        
        else
        {
            CallsubmitLead();
            alert("Account has been inserted");
        }
    }
    
 </script>
    
 <apex:form id="LF">
 <apex:actionFunction action="{!submitLead}" name="CallsubmitLead" reRender="LDB"/>  
 <apex:pageBlock title="Lead Form - Enter lead details" id="LDB"> 
  <table>
  <tr>
  <td><apex:outputText value="First Name"/></td>
  <td><apex:inputText value="{!firstName}"/></td>
  </tr>  
  <tr>
  <td><apex:outputText value="Last Name"/></td>
  <td><apex:inputText value="{!lastName}" id="Lname"/></td>
  </tr>  
  <tr>
  <td><apex:outputText value="Comapany"/></td>
  <td><apex:inputText value="{!comapany}" id="comp"/></td>
  </tr>  
  <tr>
  <td><apex:outputText value="Mobile"/></td>
  <td><apex:inputText value="{!mobile}"/></td>
  </tr>  
  <tr>
  <td><apex:outputText value="Lead Status"/></td>
  <td><apex:selectList value="{!statusOptions}">
  <apex:selectOptions value="{!items}"/>
  </apex:selectList></td>
  </tr>
  </table>  
  <apex:commandButton value="Save" onclick="validate();"/> 
 </apex:pageBlock>  
  </apex:form>
</apex:page>
Controller Code:
public class InsertLeadController {
public String statusOptions { get; set; }
public String comapany { get; set; }
public String mobile { get; set; }
public String firstName{get;set;}
public String lastName{get;set;}
public Lead l = new Lead();
public List<SelectOption> getItems() {
List<SelectOption> options = new List<SelectOption>();
options.add(new SelectOption(‘Open – Not Contacted’,’Open – Not Contacted’));
options.add(new SelectOption(‘Working – Contacted’,’Working – Contacted’));
options.add(new SelectOption(‘Closed – Converted’,’Closed – Converted’));
options.add(new SelectOption(‘Closed – Not Converted’,’Closed – Not Converted’));
return options;
}
public PageReference submitLead() {
l.FirstName=firstName;
l.LastName=lastName;
l.Company=comapany;
l.MobilePhone=mobile;
l.Status=statusOptions;
insert l;
return null;
}
}
In this example, I am calling submitLead methods from javascript.

Session settings at profile level – Winter 15 update

Now you can manage session timeout at profile level. Salesforce has provided this option in their winter 15 release. Earlier (before winter 15) we had only option to set this change at organization level. But in winter 15, you can manage session timeout at profile level. profile level changes override the organization session settings. Until you set this on a profile, the organization-wide Timeout value in the settings applies to users of the profile. Once set, the this on a profile overrides the organization-wide Timeout value for users of that profile. Changes to the organization-wide Timeout value will not apply to users of a profile with its own Session Timeout value.

where we can find these settings at org level? To find these settings at org level go to setup ->Administer-> Security controls. here you will find timeout option. See the below screen for reference.
session timeout
Where we can find these settings at profile level?
Go to setup -> administer-> Manage Users -> profile -> edit -> go to session settings & change time out value for profile. see below screen for reference.
Session Time Out At Profile Level
This option will really helpful for administrators to manage session settings at profile level.

Now you can manage password policies at profile level in salesforce

In winter’15 release salesforce has provided this feature to mange password policies like password expire in, history, length, complexity requirement, maximum invalid login attempts and lockout effective period at profile level. Earlier this option is available at organization level. Now with this winter’15 release this option is available at profile level also.

Until you set the password policies on profile, the organization policies will apply to users. Once you set the password policies at profile level, it will override organization changes. After setting password policies at profile level, if you change these settings at org – level, it won’t impact. profile settings will only apply when set these settings at profile level.

How we can set this at organization level
To find these settings at organization level, go to Settings -> Administer -> Under security controls you will find this option. see the below screen to understand.
password policies  

How can set this at profile level:
To find these settings at profile level, go to settings -> Administer -> Manage users -> profiles -> Select the profile you want to change and edit the profile to change these settings. see the below screen for reference.
password policies
 This option is available in Enterprise, performance, Unlimited and Developer editions. Need below User permissions required to edit session & password settings in profiles.
Manage permission sets & PROFILES and manage password policies.

What is a fieldset?

In this section i will explain about what is a fieldset? How can we create that? and how can we use that in a visualforce page?

Fieldset is a grouping of fields, you can use this fieldset in visualforce page to display that group of fields in that page. If you are using field set in visualforce to display fields, then you can add, remove & reorder fields very easily. No need to do code modifications to the page, In fieldset only you can add, remove & reorder fields. Generally these field sets are useful in managed packages. In manged packages , If you used field set in visualforce pages, administrators can easily add, remove and reorder fields in page. As an administrator, you can create or edit field sets and also you can edit installed fieldsets.

How to create a fieldset?
To create a fieldset, go to object, you want create fieldset by clicking on new button. Enter required fields and save. We will get below screen to add fields to field set.
Fieldset In Salesforce
Using fieldsets is very easy & you can drag and drop to arrange fields in fieldsets.

How to use field set in a visualforce page?
Below code is simple visualforce, it explains about how to use fieldset in a visualforce page.
<apex:page id=”pageId” standardcontroller=”Registration__c”>
<apex:form id=”formId”>
<apex:pageblock id=”pb”>
<apex:pageBlockSection >
<apex:repeat value=”{!$ObjectType.Registration__c.FieldSets.Registration_req_fields}” var=”fs”>
<apex:inputfield value=”{!Registration__c[fs]}”>
</apex:inputfield></apex:repeat>
</apex:pageBlockSection>
<apex:pageBlockButtons >
<apex:commandButton value=”Submit Details” action=”{!Save}”/>
</apex:pageBlockButtons>
</apex:pageblock>
</apex:form>
</apex:page>
The above code displays all fields in the field set. See the below screen to see the output of above code.
Fieldset
No need to change the code to re arrange fields in this page. What ever the order you created/edited in field set, the same order will display on this page.
We can easily make fields required. It is drag drop tool like page layout. To make required, double click on the field and check the required check box.

Important point about field sets:
- In the field set, you can span to fields that reference multiple objects. When you span a field into a field set that references multiple objects, the only field you can span to is the Name object.
- The total number of cross object spans within the In the Field Set container can’t exceed 25.

What is profile?

A profile is a group/collection of settings and permissions that define what a user can do in salesforce. A profile controls “Object permissions, Field permissions, User permissions, Tab settings, App settings, Apex class access, Visualforce page access, Page layouts, Record Types, Login hours & Login IP ranges.
You can define profiles by user’s job function. For example System Administrator, Developer, Sales Representative.
A profile can be assigned to many users, but user can be assigned single profile at atime.
Types of profiles in salesforce
  1. Standard profiles: By default salesforce provide below standard profiles. We cannot deleted standard ones.
  Read Only, Standard User, Marketing User, Contract Manager, Solution Manager & System Administrator. 
  Each of these standard one includes a default set of permissions for all of the standard objects available on the platform.
  2. Custom Profiles: Custom ones defined by us. They can be deleted if there are no users assigned with that particular one.
Navigation: setup -> Administer -> Manage users -> Profiles
profile
What is Permission Sets?
Permission set is also very similar to profile. What ever you can manage at profiles (Like Object permissions, Field Permissions, User permissions, Tab settings, App settings, Apex class permission, visualforce permission) the same you can manage here also. But the main difference between these two is that user can have only one profile and can have multiple permission sets at time.
So we can define profiles to grant minimum permissions and settings that every type of user needs, then we can use permission set to grant additional access.
Examples: 
1. We have many user in your organization with some fundamental job functions. We can assign all of then with one profile that grants them all access to do their job. But some set of people are working on special apps or some special functionality, for this type of special users we can create permission sets and can be assigned to them.
2. Some users need some temporary access to specific set of  fields and objects we can create permission set with those object & field access and we can assign that specific users.
Navigation: Setup -> Administer -> Manage users -> Permission sets
permission set

What is Role Hierarchies?

A role hierarchies controls level of visibility that users have to an organization data. By defining role hierarchies we can share access to records. Users assigned to roles near the top of hierarchies like (CEO, executives and other higher level roles) get to access the data of all users who fall directly below them i hierarchy.
Role hierarchies enable following behaviors.
A manager will always have access to the same data as his or her employees, regardless of the org-wide default settings. For custom objects, you can override this behavior by deselecting the Grant Access Using Hierarchies check box. However, we want our role hierarchy to apply to all of our custom objects, so leave the check boxes selected.
Users who tend to need access to the same types of records can be grouped together—we’ll use these groups later when we talk about sharing rules.
1.       What is the biggest difference between Apex and most programming languages?
·         Apex provides built-in Data Manipulation Calls(Like Insert,Update,Delete etc.,)without establishing any connections to database and closing the connections.
·         It provides default exception handling which throws an exception message automatically onto the screen unlike in other programming languages which throws error on to error console and shows abnormality.
But, Apex handles the exception and shows us on the page.
·         Embedded SOQL (Salesforce Object Query Language)and SOSL(Salesforce Object Search language) queries which returns the SObject results.
·         Apex is interpreted(compiled), executed and Controller by Force.com platform.
 
2.       Where can Apex be authored?  Where can it be executed?
                          Apex can be authored on Force.com editor which is provided in Salesforce SETUP pane on left side.
Apex classes are executed on Force.com platform. It cannot be executed on Local machines using tomcat  or any other servers.
 
3.       Why are governor limits important?  What are they based on?
A.      Governor limits are important because it controls the user to use the database interactions with limited control. Since, Force.com is a cloud platform , it offers multi-tenancy which provides unit platform for various Force.com tenants. If the governor limits are not set, and if most users start interacting with cloud database with no limit, then obvious burden will be imposed on Cloud.So, governor limits are important which determine the total pages visited by a client and total number of page navigations, a client can do in a day, total data base interactions that can be made in a single go.
Governor limits are based on the type of the Org we use.Generally, testing org contains different governer limits(more), and production org contains different governor limits(less).
 
4.       List a few characteristics of Apex that is different than other programming languages.
A.      Apex is strongly typed language with direct references TO Sobject and fields names.
       Apex is interpreted, Executed, Controlled by Force.com platform.
       Apex scripts can be saved against different versions of the Force.com API.
 
5.       How would an external program access functionality on Force.com platform?
          We have a concept called Web Services. Using this extended functionality, we can make external program access the functionality on Force.com platform.
We will generate WSDL document(Web Services Description Language) which will be exposed to host environment which results in extending the capability of accessing Force.com platform from external program.


6.       What are governor limits?  Why are these important in a multi-tenant environment?
A.      Governor limits are the database limits that are applied to the users who use Force.com platform. Governor limits simply means the limited database calls that a developer/user do.
      These governor limits are important because unlimited and free access to database many number of times from each time will slow down the database effectiveness.So,to preserve the database effectiveness, governor limits are important in multi-tenant environment.
 
7.       What is Run time type information?  How do obtain it in Apex?
A.      Run time type information refers to a system that keeps the information about an object’s data type in memory at run time. This run time information deals to integers, strings and generic objects.
 
8.       How do you override a method in Apex?
A.      With the help of the OVERRIDE key word in method signature, we can override a method in Apex.
        For example, we have a method  public void abc(){
},
If we want to override the method, we can do like below:
Public override void abc(){
}
 
9.       What are the ways in which Apex can be invoked?
A.      We can invoke apex in 4 ways:
a.       Triggers: By writing the apex triggers,and calling them on the 7 pre defined events of creating/modifying a record, we can invoke apex.
b.      Apex Schedule: We can schedule Apex code to be run at a particular point/for a particular period of time. We need to write some Apex code and schedule them using Apex Scheduler.By this way, we can invoke apex.
c.       Anonymous Blocks: Anonymous Block refers to a block, from where we can invoke apex by writing the logic we need. Example is as below:

d.      Apex in Ajax: For Apex, we have ajax took kit, from where we can do Apex calls. This Ajax toolkit can be used on the visualforce page using javascript notations. Using this Apex in Ajax, we can invoke Apex.
 
10.   What are some of the limitations of code that you can call via the anonymous block?
A.      Anonymous Block’s code execute with current user’s permission. So, if the user does not have field-level permissions or does not have profile permissions, then the code in anonymous block fails.
 
11.   How do you expose functionality on Force.com to be consumed by external clients?
A.      We have a concept called Web Services. Using this extended functionality, we can make external program access the functionality on Force.com platform.
      We will generate WSDL document(Web Services Description Language) which will be exposed to host       environment which results in extending the capability of accessing Force.com platform from external program.
 
12.   What would the syntax be to create a new class named MyNewClass which should be public?
A.      Syntax is:
       Public class MyNewClass{
}
Here public is the access modifier for the class. And CLASS  is the keyword to designate a class and MyNewClass is the name of the class.
 
13.   What is the difference between the global and public access modifier keywords?
A.      We have different access modifiers like global, private, public.
       If we use the access modifier as Global, it can be used anywhere in the org. Generally, Global is used for   web-services since one class needs to handle some other parts of apex in the org. Whenever we use Public keyword, then the access is limited to the particular class and cannot be used outside the related class.
 
14.   Is casting between a String and Integer allowed? 
       Allowed
 
 15 .What are different data types for Apex variables?
        Premitive and non premitive data types
 
16.What keywords are used to declare a constant?
Final and static
 
17.What special characters are used to surround SOQL or SOSL queries?
[ and ]
Ø  What is the maximum number of rows that can be brought back by a SOQL query?
o   50000
Ø  What advantage does using a variable list in a for loop have over a single variable?
o   Using list ,we save retrived data in a single list variable
Ø  What is different about a static method?
o   Static methods are not used in web services
Ø  What are the two types of iterations that can be performed in a for loop with a SOQL query?
o   Variable and variable_list
Ø  Does Apex use explicit transactional calls such as commit and rollback?
o   NO
Ø  The assert family of methods belong to which class?
o   System
Ø  What do the Limit class methods help you to manage?
Ø  How do you access the records that cause the trigger to execute? 
Ø  What are the seven different types of trigger events?
o   Before insert,before update,before delete
o   After insert,after update,after delete,after undelete
Ø  How do you specify that a trigger is a “bulk trigger?”
o   By default all triggers are bulk triggers
Ø  Under what identity do triggers execute?  What ramifications does that have?
Ø  Is it necessary to import a WSDL to perform a callout?
o   NO
Ø  What does the @future annotation do?  What are the other annotations available with Apex?
o   @future  is used to execute methods asynchronously.
o   @istest,@readonly,@remoteAction,@depricited
:11� :#t b 0# �O id black 1.0pt; border-top:none;mso-border-top-alt:solid black .5pt;mso-border-alt:solid black .5pt; padding:0in 5.4pt 0in 5.4pt'>
Total Heap Size
300000 Bytes
3MB
1.5MB