Force.com IDE
What is Force.com IDE? It is powerful tool, which is used to create/modify & deploying Salesforce applications.
How to install force.com IDE?
1. Install Java SE Development kit
(JDK), Runtime environment – Force.com plug in will fail to load if you
don’t have the full Java JDK.
2. Install eclipse.
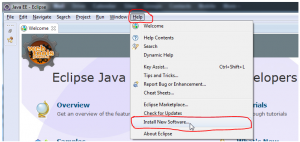
3. After installing eclipse, launch eclipse and go to help and click on install software.
4. Click on add, in the add repository dialog window, set the name to “Force.com IDE” and give location to” http://media.developerforce.com/force-ide/eclipse42”. (This URL is for eclipse 4.2 & 4.3). Click on OK.
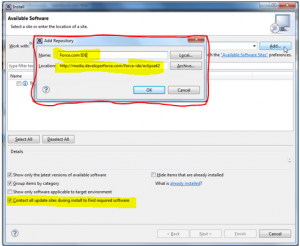
5. If you don’t have latest version of
the software (java & eclipse), then clear the first checkbox the
above screen details section. You will get all available versions of
force.com IDE plug-ins & select the check box next to the force.com
plug-in you want to install and click on next.
6. And click on next & accept terms and conditions and click on finish.
7. Eclipse downloads and installs the
Force.com IDE and any other required dependencies. When install
complete, you will be prompted to restart. Click yes.
8. When Eclipse restarts, select Window > Open Perspective > other, select Force.com and click OK.
Now you are ready to develop &
customize Force.com applications in Eclipse. Use proxy settings when are
working in secured networks. You can find this in General -> Network connection


0 comments:
Post a Comment
Note: only a member of this blog may post a comment.